If you need to provide a number of different views on the same
data set, or separately present a number of different tasks
relating to your application, Apple recommends using a tab bar
application. Both the iTunes and the App Store applications that ship with
the iPhone and iPod touch are examples of applications that use this
pattern.To create a tab bar application, open Xcode and start a new project.
Select Tab Bar Application from the New Project window as the template and
name it “TabExample” when requested.
Unlike some of the other application templates provided by Apple,
there are actually several different approaches you can take to building a
tab bar application: loading a tab’s view from a secondary NIB, managing
the tab’s view entirely from a view controller, or using a hybrid of these
two approaches.
The default template provides a tab bar application with two tab
items, but the way the view is managed for each of these items is very
different. Double-click MainWindow.xib (it’s in the Resources
group) to open it in Interface Builder. Next, make sure MainWindow.xib is
the foremost window and switch to List Mode (⌘-Option-2), then fully
expand Tab Bar Controller by Option-clicking the disclosure triangle to
its left.
In Figure 1 you
can see that under the Tab Bar Controller entry is the tab bar itself, and
then two view controllers, each with a tab bar item.
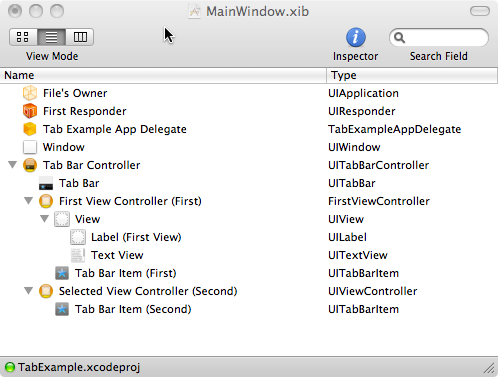
Notice that the “Selected View Controller (Second)” view controller
has type UIViewController. Select it
and open the Attributes Inspector window (⌘-1) and you’ll also see that it
loads its view from the SecondView.xib file that Xcode
generated when you created the new project.
However, the “First View Controller (First)” entry is of type
FirstViewController
rather than UIViewController. The view
here is managed slightly differently. It has no linked NIB file, and the
custom view controller manages its own view.
The template generated by Apple therefore illustrates two very
different ways to manage views inside a tab bar application. However, I
recommend that you use neither of these two. Instead, I usually approach
view management in a slightly different manner: by using a custom view
controller class to manage the view, but storing the view outside the
MainWindow.xib in a separate NIB file.
1. Refactoring the Template
Let’s refactor the current template to reflect my prejudices.
Don’t worry if you think one of the other approaches
sounds better; you should learn enough while refactoring the template to
manage your views in either of the other two ways.
1.1. Creating the first tab
In Xcode, create a new View NIB called
FirstView.xib. Then back in Interface Builder
(MainWindow.xib, not the newly created NIB) click
on the UIView managed by “First
View Controller (First)” and press the Backspace key to delete it.
This will also delete its children (a label and text view).
Next, click on “First View Controller (First)” and navigate to
the Attributes Inspector (⌘-1). Using the NIB Name drop down, select
your newly created FirstView NIB from the list of NIB files in the
project.
Note:
To add a new View XIB to the project, right-click or
Ctrl-click on the Resources group in the lefthand pane in Xcode and
select Add→New File. When the New
File window opens select User Interface from under iPhone OS, then
choose View XIB and click Next. Enter the name for the new NIB and
then click Finish.
Now open the FirstView.xib file and click
File’s Owner in the main window. Then, using the Identity Inspector
(⌘-4), change the Class identity of File’s Owner from NSObject to UIViewController. Next, use the Connections
Inspector (⌘-2) to connect the view outlet to the view in
FirstView.xib.
Save both of the NIB files and return to Xcode.
1.2. Creating the second tab
We also need to create a custom view controller for the second
tab view. Go back into Xcode and right-click or Ctrl-click on the
Classes group and select Add→New File.
When the File window opens select a UIViewController subclass from the Cocoa
Touch Class panel, but unlike earlier examples in this book, uncheck
the “With XIB for user interface” box (we already have a
SecondView.xib file in the project). Click Next.
When asked, name the new view controller
“SecondViewController.m”.
Go back to MainWindow.xib in Interface
Builder and click on the “Second View Controller (Second)” entry. In
the Identity Inspector (⌘-4) change the Class identity from UIViewController to SecondViewController.
You don’t need to connect the view outlet as you did for the
FirstView.xib file because Xcode created the
second tab bar item with its outlets connected correctly by
default.
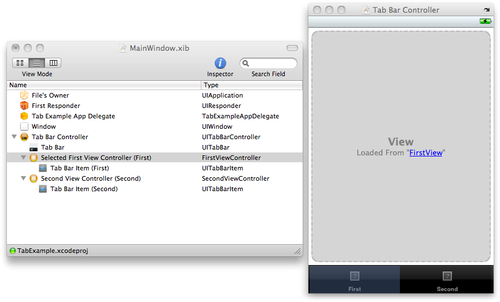
1.3. Wrapping up the refactoring
After doing this refactoring, you should end up with a
MainWindow.xib file that looks a lot like that
shown in Figure 2.
Make sure you save the NIB file after finishing the
refactoring.
2. Adding Another Tab Bar Item
Let’s add another tab bar item so that you can see how to create
one from scratch. With MainWindow.xib open in Interface
Builder, drag and drop a new tab bar item (not a tab bar) from the
Library window (under Cocoa Touch→Windows, Views, & Bars) onto the tab bar
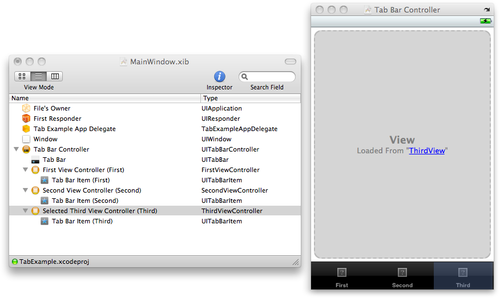
controller in the MainWindow.xib window. Click the disclosure triangle
next to the new tab bar item, and you’ll notice that it generates
another view controller with an associated tab bar item. The new view
controller is similar to “Second View Controller (Second)” before
refactoring, with a type of UIViewController. If you check the Attributes
tab of the Inspector window, however, you’ll notice that the new
controller currently has no view associated with it in Interface
Builder, as shown in Figure 3.
We now need to add a view controller to manage this tab. Go back
into Xcode and right-click or Ctrl-click on the Classes group and select
Add→New File again. When the File window
opens, select a UIViewController
subclass from the Cocoa Touch Class panel; this time check the “With XIB
for user interface” box, as you need Xcode to generate a NIB. When
asked, name the new view controller “ThirdViewController.m”.
Note:
For neatness, you may want to drag the ThirdViewController.xib file from
the Classes group to the Resources group. You may also want to rename
the ThirdViewController.xib file to
ThirdView.xib to keep your naming conventions
consistent throughout the application.
After doing this, edit MainWindow.xib in
Interface Builder by changing the type of the newly created “View
Controller (Item)” from UIViewController to ThirdViewController in
the Identity tab of the Inspector window, and then set the NIB name to
ThirdView in the Attributes Inspector
(⌘-1).
You should explore some of the standard tab bar items that Apple
provides; for example, expand the newly added third view controller’s
disclosure triangle in the MainWindow.xib window. Next, select the
tab bar item underneath it and open the Attributes Inspector (⌘-1). Try
selecting something other than Custom for its identifier and see what
happens.
This example assumes you use the Custom identifier, so make sure
you set it back to Custom when you’re done exploring.
After selecting Custom, you should change the name of the item
from “Item” to “Third”. Although currently our tab bar item doesn’t have
an image, we could associate one with (each of) our tabs using the
Image drop down in the Attributes tab. Just drag and drop the image you
want to use into the project in the same way you added the images for
the City Guide application in this article. To look like Apple’s icons,
your images cannot be larger than 32×32 pixels in size and they must
have a transparent background. I’ve found that PNG images between 20 and
30 pixels work well as tab bar icons.
Creating tab-bar-based applications means you must create icons
for the bar. You may be able to use the system-supplied icons, either
by setting the Identifier by clicking on the UITabBarItem on the
MainWindow NIB file and changing the Identity
value in the Attributes tab of the Inspector window inside Interface
Builder, or directly via code inside your view controller’s init: method, as shown here: self.tabBarItem = [[UITabBarItem alloc]
initWithTabBarSystemItem:UITabBarSystemItemSearch tag:0];
However, the selection of available icons is fairly limited and
you will inevitably have to resort to creating your own. Apple has
this to say on tab bar icons: “The unselected and selected images
displayed by the tab bar are derived from the images that you set. The
alpha values in the source image are used to create the other
images—opaque values are ignored.” Effectively the alpha channel of your image will determine the shading
of your icon. Tab bar icons should therefore be in PNG format, be no
larger than 30×30 pixels in size, and have a transparent background.
Multicolor icons are ignored as the icons themselves are an opaque
mask which the iPhone will use to generate the actual tab bar
icon. |
3. Finishing Up
Finally, edit the three NIB
files—FirstView.xib,
SecondView.xib, and
ThirdView.xib—and add a large (in 144 pt font)
label saying “1”, “2”, and “3” to each respective view. This way you can
confirm that the correct one is being activated.
SecondView.xib will have some labels on it that
were placed there when Xcode generated the project from its template;
you can delete these labels.
Make sure you save all the NIB files. Then, click Build and Run to
compile, deploy, and run the application in iPhone Simulator, as shown
in Figure 4.
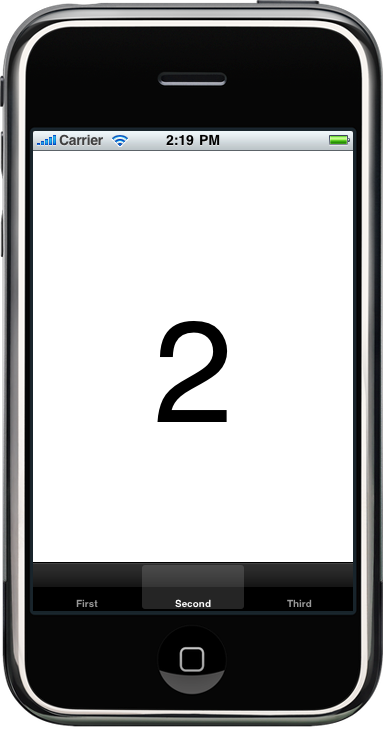
Despite the fact that we haven’t written a single line of code in
this section, you should now have a working, if rather basic, tab bar
application.
Although I haven’t walked you through the process of building a
full-blown application, you should have begun to see the commonalities
and familiar patterns emerging in this application. Our application has
an application delegate along with three custom view controllers
managing each view.
At this point, you may want to try building your own application
on top of the infrastructure we have created so far. Start with
something simple where changing something in one view affects the
contents of another view. Don’t worry; take your time, and I’ll be here
when you get back.